eurobot2022-UK
Welcome to ICRS Eurobot Wiki
The following is the summary of the work done for Eurobot 2022. Before reading further, it might be nice to look at the rules.
Eurobot Map
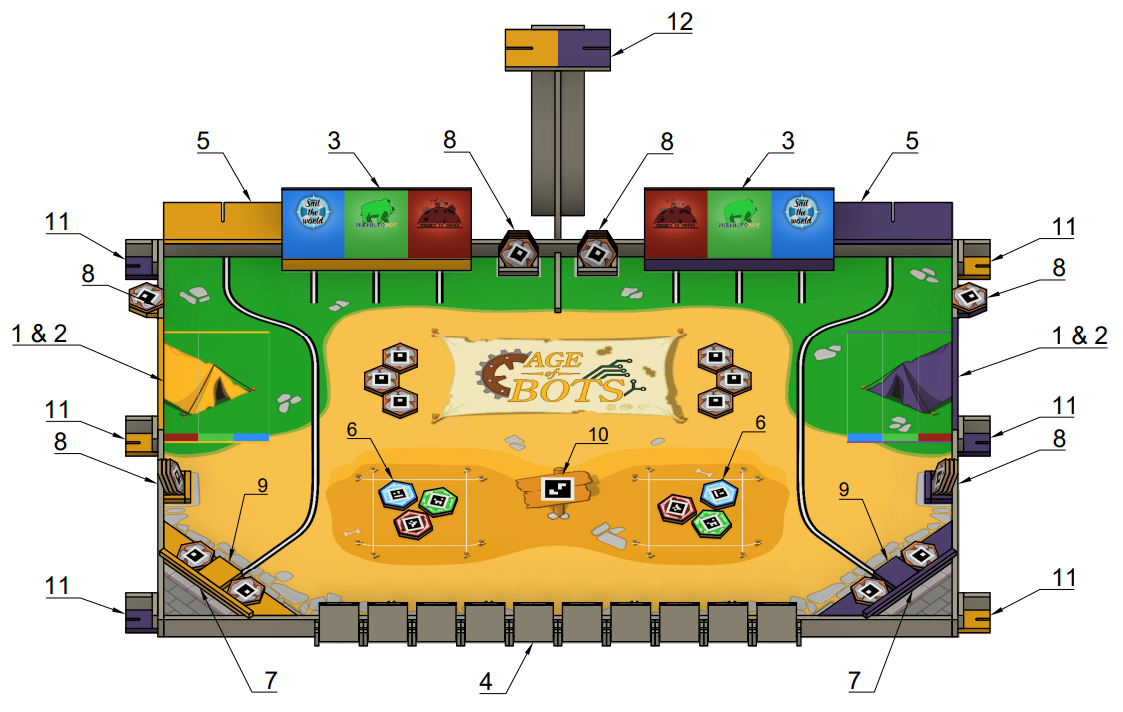
Here is an image of the Eurobot 2022 field, for reference. Further details can be found on Page 10 of the rules.
Eurobot 2022 Qualifiers
Robot 1 ("Sweeper Robot")

Robot 1's purpose was the task of storing "samples" (hexagons) in the Work Shed (7 on the map).
Robot 1 Strategy
- Identify which side of the arena it is on by comparing the distances reported by the left and right ultrasound (US) sensor.
- We always put the Sweeper Robot closer to the center of the field (on the right, if on Yellow side, and on the left, if on Purple side). Therefore, for this robot, the left US will have a lower reading if on the Yellow side, and vice-versa if on the Purple side.
- Travel to a set of pre determined waypoints depending on which side the robot is on.
- These waypoints correspond to where the hexagons are placed horizontally on the robot's side of the field. There are 6 such hexagons on each side: the 3 coloured hexagons placed in the Excavation Site (6 on the map) and the 3 upside-down (brown) hexagons placed above them.
- As the robot travels along the set of waypoints, it will catch the hexagons in its arms and push them eventually towards the Work Shed (7).
- At the Work Shed, the pusher is activated to give the samples a final nudge into the corner of the field, which scores us points.
- Finally, the robot moves back to the Excavation Site (6) to end its run.
Run Demo
 link redirects to Youtube
Sensors
| Sensor | Purpose | Processor Responsible | Remark |
|---|---|---|---|
| USB Camera | Provides vision to allow robot to localise with respect to an ARUCO code placed on a Fixed Beacon Support (11) on the central axis of the field. |
Jetson Nano | |
| Gyro/Compass | Gives the robot an absolute heading without needing to see the ARUCO code | One of the STM32s | @Joshua can give more documentation details on this |
| Ultrasound Sensors | The side-mounted US sensors let the robot know which side of the field it starts on (see Strategy section 1). The front sensor is used to detect other robots/obstacles ahead of the robot, so that the robot doesn't collide with them. |
3 sensors connected to one of the STM32s | Robot obstacle detection is currently unimplemented |
| Motor Encoders | Gives odometry information to the robot, allowing it to move set distances. | Arduino Mega |
Processors
- Jetson Nano: Single Board Computer (SBC) with a GPU that allows it to perform fast computer vision tasks. Here, we used it to detect the orientation of an ARUCO code to correspondingly detect the pose of the robot.
- 1x Arduino Mega: The Arduino Mega has many GPIO (general purpose input/output) pins that allow it to connect to different sensors.
- 2x STM32 Modules:
- Some sensors are difficult to interface with (eg. the Gyro/Compass).
- The US sensors are blocking, which means that the microcontroller has to wait idly if it does not return a value. This is not satisfactory for controllers that control the motors, for example. Therefore, a separate microcontroller is used.
- The STM32 controllers are configured as I2C (inter-integrated circuit) slaves, which mean they can be accessed like regular sensors to other microcontrollers.
- For more details, ask @Joshua
Motors
- 2x Drive Motors connected to L298N motor driver.
- 2x 28BYJ-48 Stepper Motors connected to ULN20003 stepper driver for the pusher mechanism.
- 1x Turntable Module
Dependency Graph
Jetson Nano
└── USB Ports (4x)
    ├── USB Camera
    ├── USB Wifi Adapter
    ├── Arduino Mega
    │   ├── I2C
    │   │    ├── STM32 : Gyro/Compass
    │   │    ├── STM32 : 3x Ultrasound Sensor
    │   │    └── TCA9485 I2C Multiplexer
    │   │        └── 2x AS5600 Magnetic Motor Encoder
    │   └── GPIO
    │       ├── 2x Limit Switches for Pusher Mechanism
    │       ├── 2x ULN20003 Stepper Motor Driver
    │       ├── 1x L298N Motor Driver
    │       └── 1x GPIO for Starter Mechanism
    └── Arduino Nano (Turntable)
        ├── I2C
        │    └── AS5600 Magnetic Motor Encoder
        └── GPIO
             └── ULN20003 Stepper Motor Driver
Vision
- Check out the README in the
aruco_navigationsection of the Git repo.
Pusher Mechanism
- The pusher is a rack-and-pinon system nestled inside the robot. It is powered by a pair of stepper motors, one on each side of the robot.
- A pair of limit switches 'zeroes' the stepper system. These limit switches are set to be activated when the pusher mechanism pulls entirely backward.
Arduino Mega Driver Code
- Check
move_distance_stepper. - Essentially implements an interface for the Jetson to command the Arduino Mega over Serial. Op-codes are used to command the robot to perform certain actions.
- There are 5 operational modes. These are done by sending Serial messages to the Arduino Mega at 57600 baud rate.
- If you are having issues communicating, try toggling the "line ending" setting in the Arduino Serial Terminal.
Command Structure:
MOVE_COMMAND: 0- Syntax:
MOVE_COMMAND <l_dist> <r_dist> - Return:
<l_dist_travelled> <r_dist_travelled> - Moves the robot's wheels a given distance in centimeters.
- Returns the measured distance travelled by both wheels (in the case that the actual distance moved is somehow different)
- Syntax:
TURN_COMMAND: 1- Syntax:
TURN_COMMAND <delta> - Return:
<heading> - Turns an angle relative to the current orientation of the robot. Positive clockwise, negative anticlockwise.
- Returns the absolute orientation of the robot wrt the compass initialized angle.
- Syntax:
CHECK_COMMAND: 2- Syntax:
CHECK_COMMAND - Return:
<starting_position> - Checks and returns if the robot is on the yellow or purple side based on the ultrasound sensor readings.
- Syntax:
PUSH_COMMAND: 3- Syntax:
PUSH_COMMAND - Return:
<PUSH_DISTANCE> - Extends the pusher mechanism outward by
<PUSH_DISTANCE>steps. - Returns the value of
<PUSH_DISTANCE>.
- Syntax:
PUSH_RESET_COMMAND: 4- Syntax:
PUSH_RESET_COMMAND - Return:
"RST_DONE" - Retracts the pusher mechanism inward until the limit switches are triggered. This effectively resets the pusher mechanism.
- Syntax:
Reading from the wheel encoders
For some reason, the AS5600 encoder breakout board does not support I2C address reassignment. The TCA9485 I2C multiplexer is used to read from both left and right encoders.
The tutorial from Adafruit was followed and implemented in the code.
For a better understanding of the exact implementation of the code, I encourage you to take a look at the source code (it's not doing anything fancy). Feel free to ask me if you have any questions.
Robot 2 ("Grabber Robot")

Robot 2's purpose was to grab the Statuette from the Pedestal (9 on the map) and place the Replica onto it. It would then put the Statuette onto the Display Cabinet (5 on the map).
Robot 2 Strategy
- Identify which side of the arena it is on by comparing the distances reported by the left and right ultrasound (US) sensor.
- The distance comparisons are swapped around compared to Robot 1 Strategy - the left US will have a higher reading if on the Yellow side, and vice-versa if on the Purple side.
- As per the rules the robot has the Replica already in one of its claws.
- The robot moves straight until one of its light sensors detects a line. It then turns towards the Pedestal (9) and drives until it reaches it, which is sensed using the front-facing US sensor.
- Using the empty grabber arm, the robot grabs the Statuette from the Pedestal. It then turns the turntable 180 degrees for the Replica grabber arm to deposit the Replica onto the Pedestal.
- The robot then drives backwards, line tracking using its backwards light sensors, to reach the Display Cabinet (5). Note that on the map, there is a curved line that connects the two. Using the rear-facing US sensor, the robot is able to detect when it has reached the Display Cabinet.
- The robot deposits the Statuette onto the Display Cabinet.
- The robot drives back to the starting position using odometry / dead reckoning.
Sensors
| Sensor | Purpose | Processor Responsible | Remark |
|---|---|---|---|
| Light Sensors | Line Tracking | Arduino Mega | We picked up two random sensors from RobotShop link. These output individual analog voltages for line tracking. |
| Motor Encoders | Gives odometry information to the robot, allowing it to move set distances. | Arduino Mega | |
| Herculex Smart Servo | Convenient way to accurately set the positions of the robots' claws. | Arduino Mega | |
| Ultrasound Sensors | The side-mounted US sensors let the robot know which side of the field it starts on (see Strategy section 1). The front and rear sensors are used to detect other robots/obstacles ahead of the robot, so that the robot doesn't collide with them. They also allow the robot to detect if it is currently approaching a shelf, so it can deposit items. |
4 sensors connected to one of the STM32s | Robot obstacle detection is currently unimplemented |
Processors
- 1x Arduino Mega: The Arduino Mega has many GPIO (general purpose input/output) pins that allow it to connect to different sensors.
- 1x STM32 Module: Connected to 4x Ultrasound Sensor
Motors
- 2x Drive Motors connected to L298N motor driver.
- 2x Herculex DRS-0101 Smart Servos for the claws.
- 1x Turntable Module
Dependency Graph
Arduino Mega
├── Serial1(Tx/Rx)
│   └── Arduino Nano (Turntable)
│        ├── I2C
│        │    └── AS5600 Magnetic Motor Encoder
│        ├── SoftwareSerial
│        │    └── 2x Herculex DRS-0101 smart servos for claws
│        └── GPIO
│             └── ULN20003 Stepper Motor Driver
├── I2C
│   ├── STM32 : 4x Ultrasound Sensor
│   └── TCA9485 I2C Multiplexer
│         └── 2x AS5600 Magnetic Motor Encoder (not put on final bot)
└── GPIO
    ├── 2x Light sensor module
    ├── 1x L298N Motor Driver
    └── 1x GPIO for Starter Mechanism
Line Following
- @David
Grabber
- @David
Turntable Module
- @TY
Arduino Nano Driver Code
- @TY
STM32 I2C Slaves
- @ Joshua